I’ve used a QNAP TS-212 NAS for about 6 years. During that time I had two disk failures (and the first one taught me that RAID1 is not a waste of space), second happening last autumn. Since this setup was bugging me for quite some time, I decided to build a PC that will replace it. With this post I’ll describe installation process of Fedora Server Edition on double software RAID1 - one for an operating system and another one for a data storage.
The story of TS-212
Dedicated NAS devices are great - you don’t need to hassle with OS installation, updates are easy, there’s very little that can go wrong with it. Unless you want to run a Linux distribution on it. Most of devices can’t do that, and those that can, can get nasty when something goes south (thank you Debian for making initramfs bigger without changing it’s load address so it would overlap with the kernel - I didn’t have anything better to do that night).
TS-212 has a pretty decent Linux support (based on Debian) and I’ve been using it from day one. Since the storage for the operating system is very limited, at first I’ve put a Linux OS on one of the hard drives and that was fine until there was a disk failure. That’s the kind of time when you realize you do need backups.
To recreate a server, I bought a new pair of disks, a USB3 flash drive on which I installed Debian and configured a software RAID1 on hard drives. That setup was rock-solid for 3 years and 3 months, when one of the drives gave up (exactly 3 months past warranty, I mean, really). In addition, after a few reboots while I was diagnosing a HDD failure, Debian wouldn’t boot any more. As it turned out, flash drive had enough, too. That was a clear sign that I needed a new server and that’s how TS-212 got retired.
PC instead of a NAS
I went shopping, picked up AMD’s cheapest Athlon, motherboard with enough SATA ports, two SSDs, two HDDs, a couple of RAMs and a PSU - the rest of needed parts I already had at hand. Few days later a package came in and I started setting everything up.
The goals for a server:
- low power consumption
- relatively high computing power
- Fedora Server-based
- RAID1 for OS, another RAID1 for storage
- Disk / partition encryption with LUKS
The only downside of this setup is power consumption in comparison to previous solution. Dedicated NAS was taking about 12 Watts of power at 100% load, PC solution is eating a whopping 60 Watts when idle and around 100 Watts at 100% load. But on the other hand, what took minutes on NAS now takes seconds on the PC, so that’s some sort of a win.
RAID - hardware or software based?
I’ve been using a software RAID on my NAS and I wasn’t particularly happy with the performance - with hardware-accelerated encryption all I could get from HDDs was 20 MB/s. Since I was getting new hardware, I wanted to squeeze all the performance I could get, so I thought that I would get some bonus speed from switching to hardware-based RAID. Fortunately a motherboard I bought had an integrated RAID controller. I started reading about it and things got a little bit complicated:
- Hardware RAID is fine as long as you don’t plan to change hardware: it seems that moving from one controller to another is not an option if you want to keep your data.
- In order to keep data consistent, I would either have to disable controller’s cache (here goes the bonus speed) or put a backup power supply that would cleanly shuts down the server (extra cost).
- With SIMD instructions and hardware-accelerated AES in the CPU, performance penalty of software RAID is negligible in comparison with mainstream controllers.
Turns out that it was the right choice - I’m able to get around 101 MB/s over 1 GBit network and CPU is not getting particularly busy with the encryption itself, there are other bottlenecks (like SATA or the HDD itself).
System installation
The partition layout is quite complicated - I wanted to have a separation between operating system and storage space. Assuming that following disks are present:
- /dev/sda (first SSD)
- /dev/sdb (second SSD)
- /dev/sdc (first HDD)
- /dev/sdd (second HDD)
Partition layout for operating system is as follows:
- /dev/sda (operating system RAID1 array member #1)
- /dev/sda1 (EFI)
- /dev/sda2 (boot)
- /dev/sda3 (linux)
- /dev/sdb (operating system RAID1 array member #2)
- /dev/sdb1 (EFI)
- /dev/sdb2 (boot)
- /dev/sdb3 (linux)
- /dev/sdc (storage RAID1 array member #1)
- /dev/sdd (storage RAID1 array member #2)
For the purpose of this post, screenshots comes from a virtual machine that I’ve created with four virtual disks attached (2x8 GiB + 2x1 GiB).
Easy way - GUI
Just released Fedora 32 Server Edition will serve as an example.
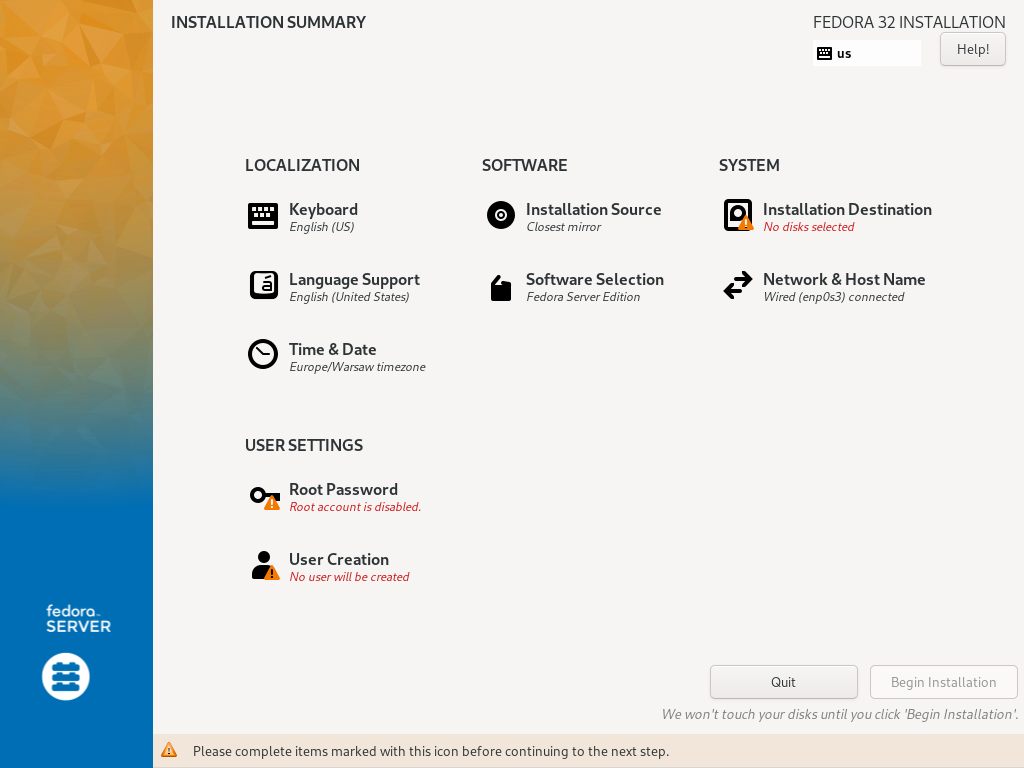
When installer boots up, you’ll see a welcome screen with language selection. Once you select your language, you’ll see Installation Summary. Installation Destination is the section you’re looking for:
 Installation summary
In that section you’ll see a list of local disks - select those which will be used to install Fedora. Storage configuration gives you three options:
- Automatic: Fedora will pick optimal partitioning scheme.
- Custom: you’ll be able to customize some aspects of partitioning, or even do it all from scratch. Unfortunately it’s not able to create LVM inside RAID array - when you select a partition for RAID configuration, you won’t be able to format it as LVM Physical Volume.
- Advanced Custom (Blivet-GUI): that’s the spot. Blivet GUI Partitioning tool is the most advanced tool at hand and is capable of creating assumed partitioning scheme.
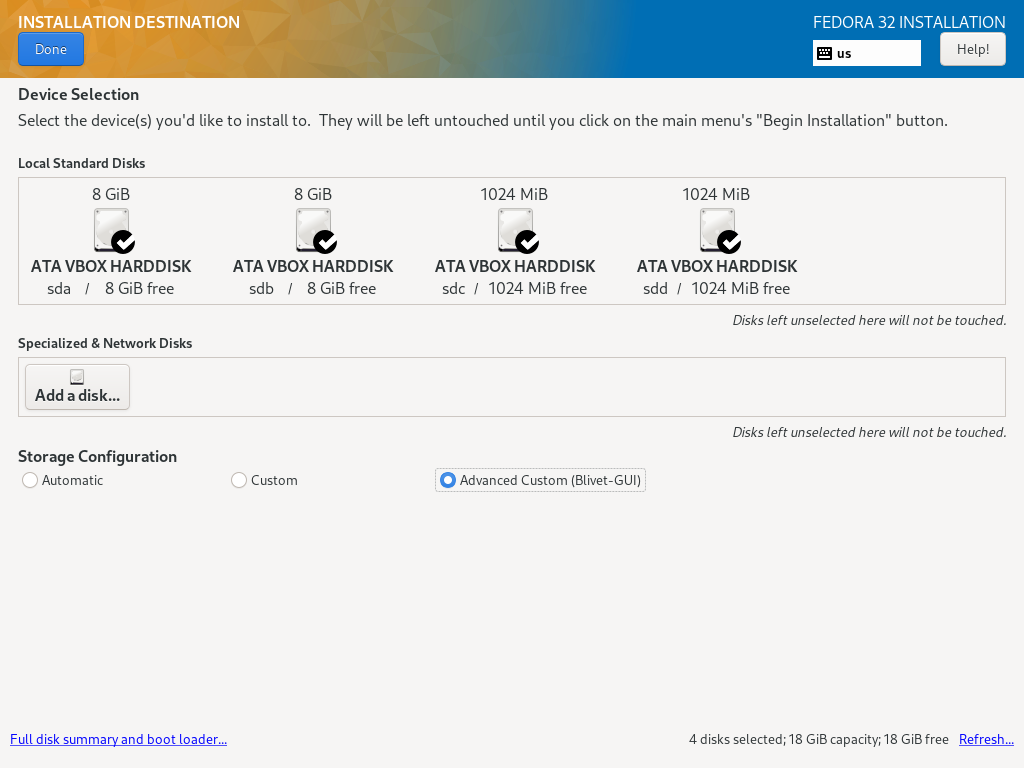 Installation Destination
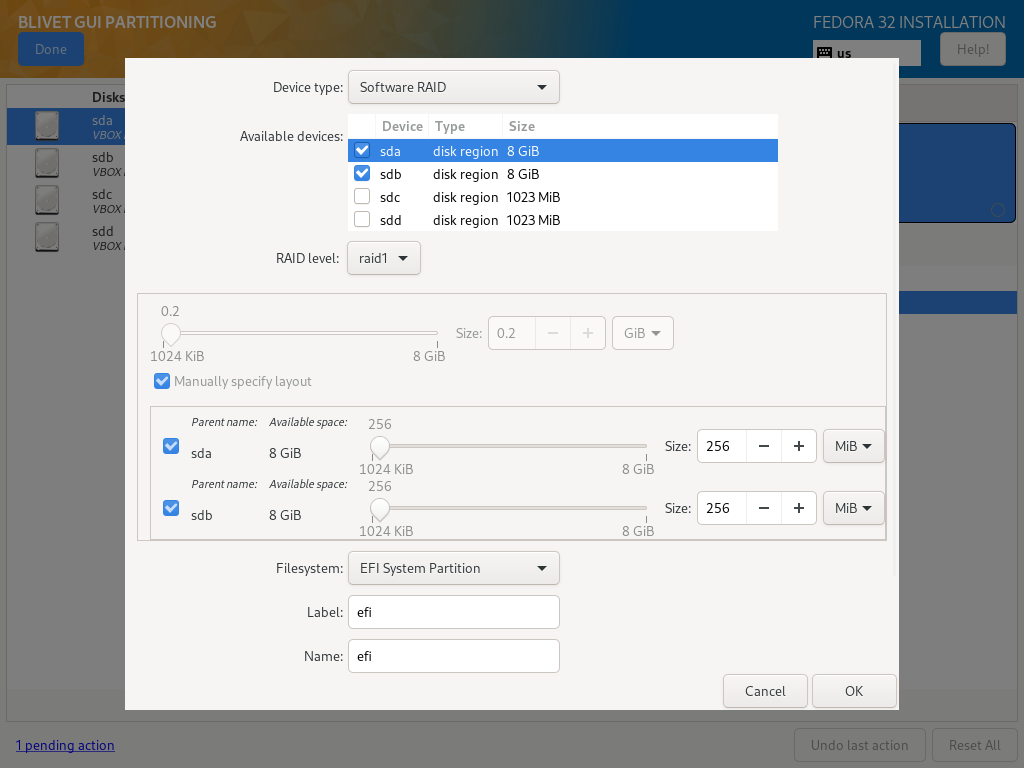
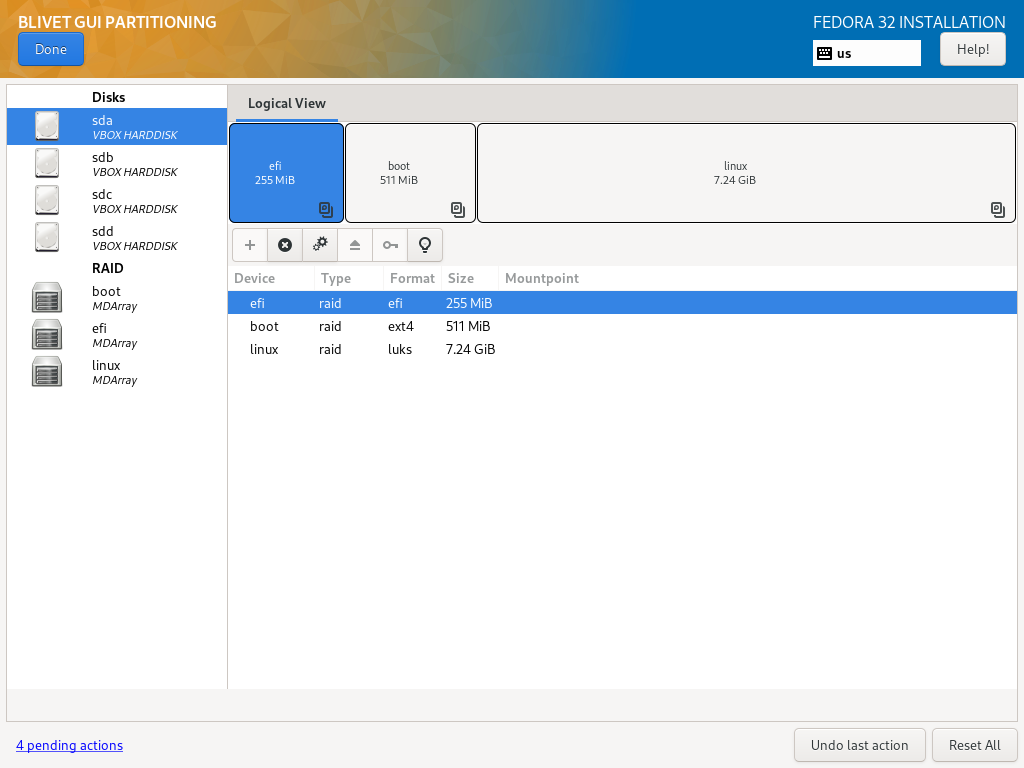
Once you’re in Blivet, select first disk meant for system installation (in this example, sda) and create a system partitions. When dialog pops up, select second disk that will be used for the system partitions (sdb).
EFI
- Device type: Software RAID
- Available devices: sda, sdb
- RAID level: raid1
- Size: at least 256MiB
- Filesystem: EFI System Partition
- Label: efi
- Name: efi
 EFI Partition Configuration
boot
- Device type: Software RAID
- Available devices: sda, sdb
- RAID level: raid1
- Size: at least 512MiB
- Filesystem: ext4
- Label: boot
- Name: boot
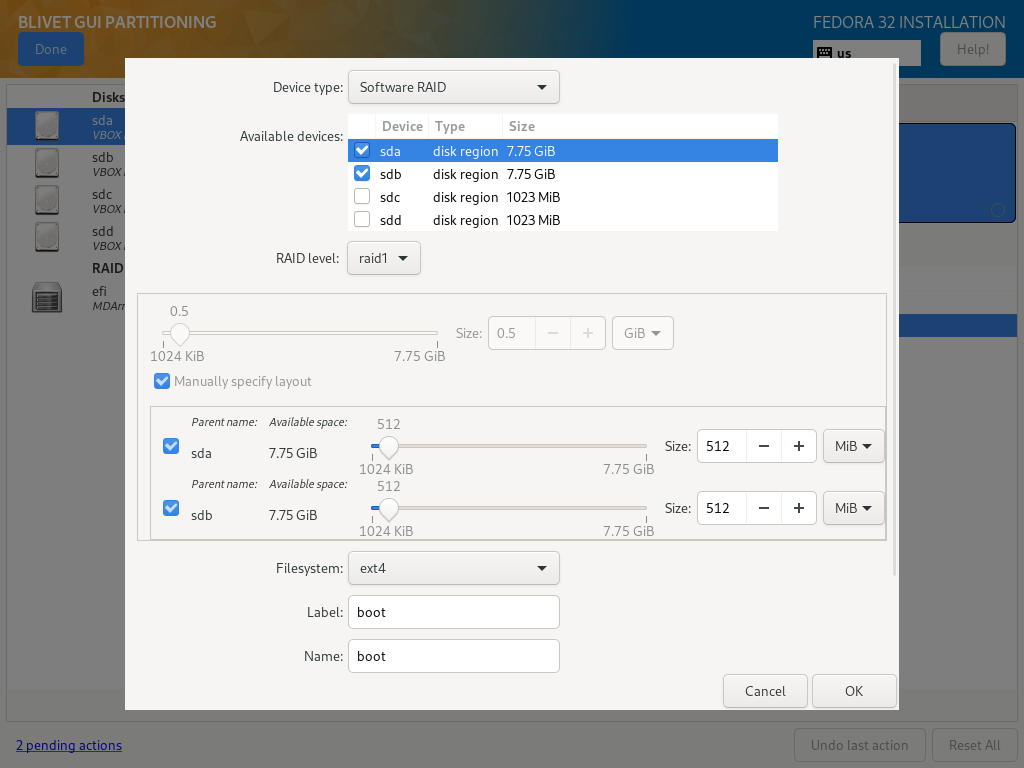 Boot Partition Configuration
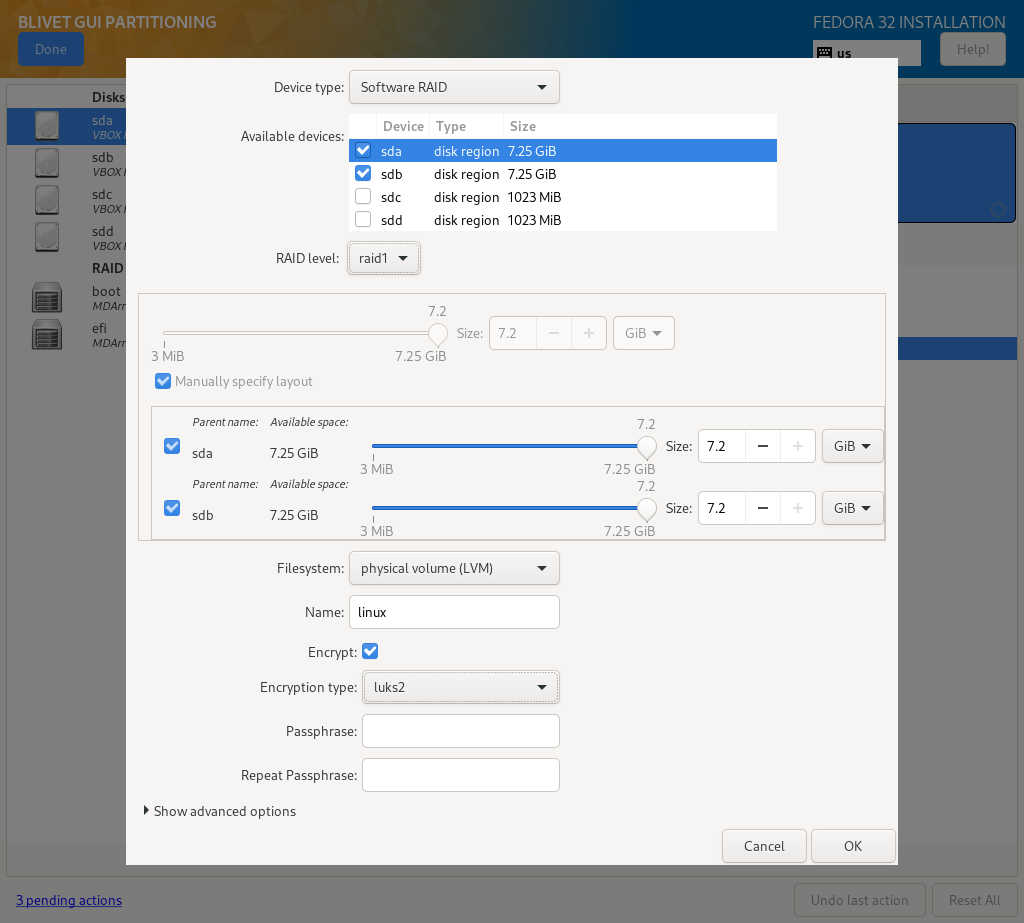
linux
- Device type: Software RAID
- Available devices: sda, sdb
- RAID level: raid1
- Size: remaining space
- Filesystem: physical volume (LVM)
- Name: linux
- Encrypt: checked
- Encryption type: luks2
- Passphrase: your password that will be used to unlock the system
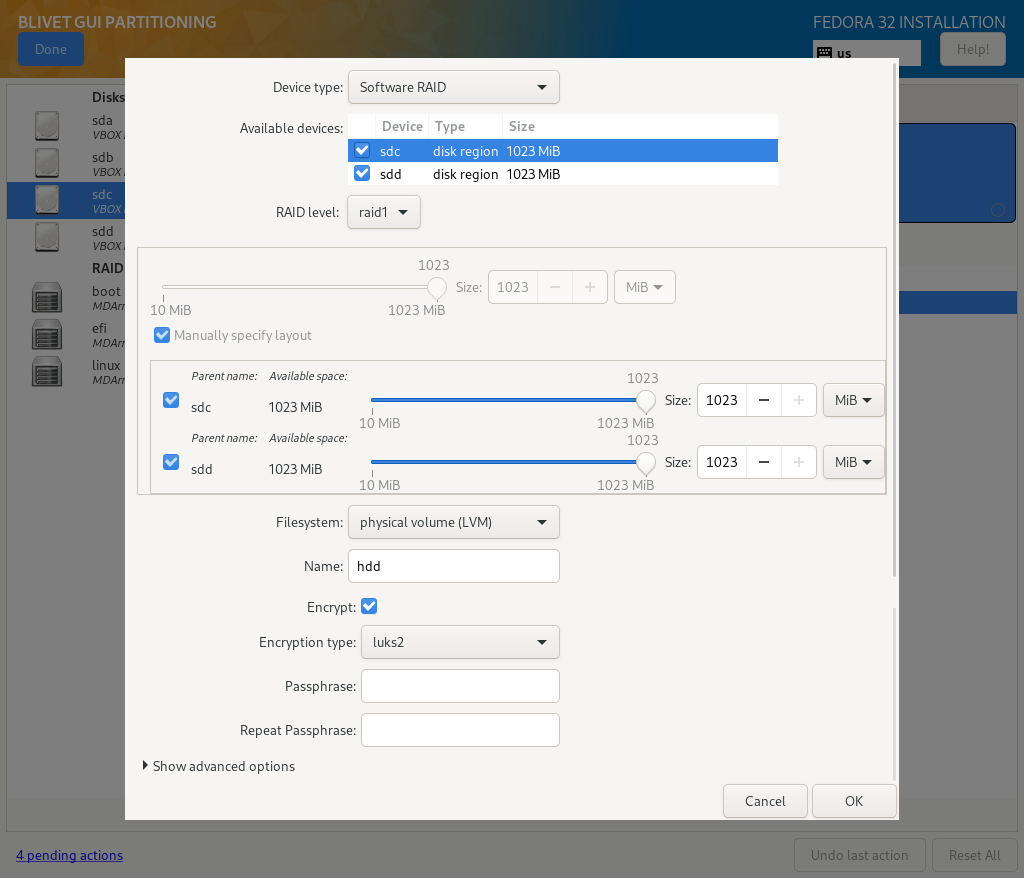
Next step is to create HDD Physical Volume:
- Device type: Software RAID
- Available devices: sdc, sdd
- RAID level: raid1
- Size: 100% capacity
- Filesystem: physical volume (LVM)
- Name: hdd
- Encrypt: checked
- Encryption type: luks2
- Passphrase: password
Note that if you pick a different password than for linux physical volume, then you’ll have to type password twice - one for linux PV and one for hdd PV. However, if you select same password for both linux and hdd PVs, then you’ll type password only once - system will try to use one password to unlock all encrypted volumes, only if it fails to do so, will ask for another password.

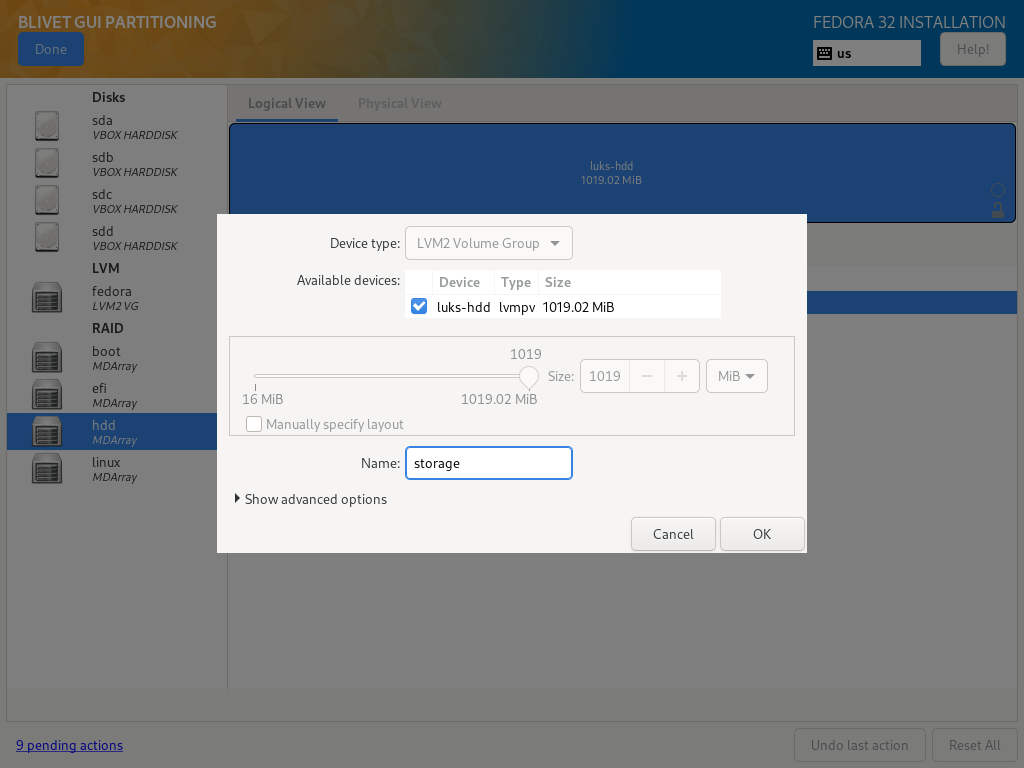
Once you have all LVM Physical Volumes in place, you can create Volume Groups.

Inside Volume Groups create target partitions - those will be the volumes used to install the system. I’ve chosen to separate /home directory from root filesystem:
Fedora Volume Group
| Size | Filesystem | Label | Name | Mountpoint | Encryption |
|---|---|---|---|---|---|
| as needed | ext4 | rootfs | rootfs | / | No |
| as needed | ext4 | home | home | /home | No |
Fedora Server Edition defaults to XFS filesystem, but since it has a downside of not being able to shring partitions, I decided to go with ext4. Root partition size depends on how much stuff you’ll install on your server - typically 30 GiB should suffice.
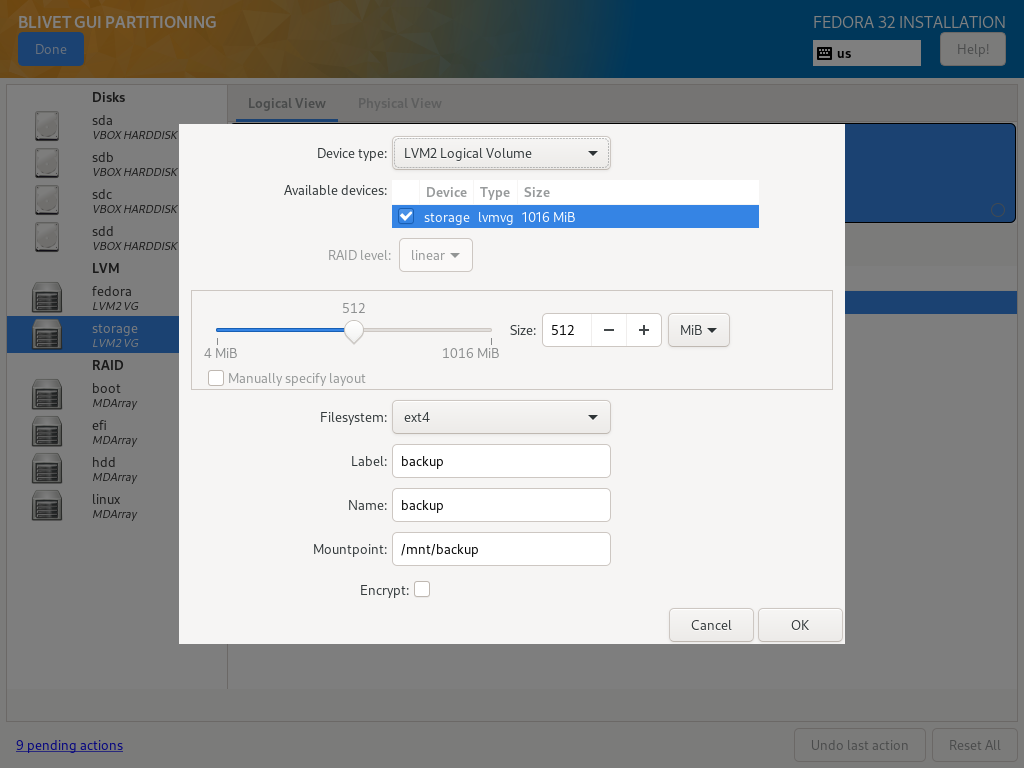
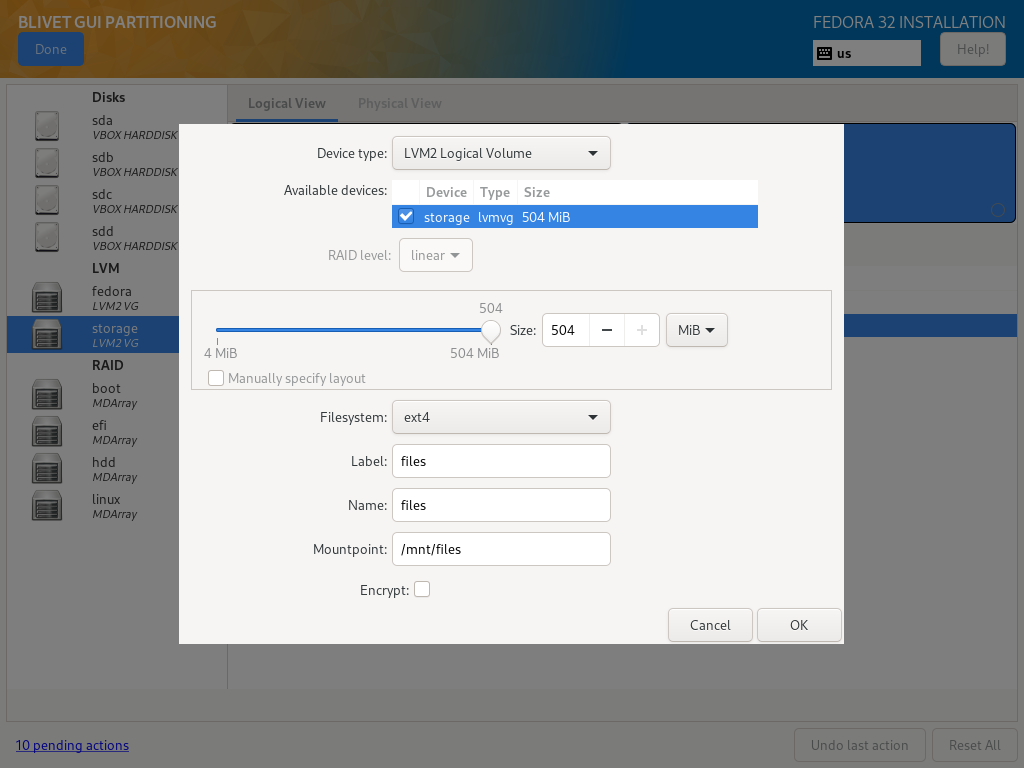
Storage Volume Group
Storage Volume Group, for the sake of example, was divided into two Logical Volumes - one for files, second for backups:
| Size | Filesystem | Label | Name | Mountpoint | Encryption |
|---|---|---|---|---|---|
| as needed | ext4 | files | files | /mnt/files | No |
| as needed | ext4 | backup | backup | /mnt/backup | No |


If you click “Done” button, you’ll get a notification about an error:
 Error message upon partitioning completion
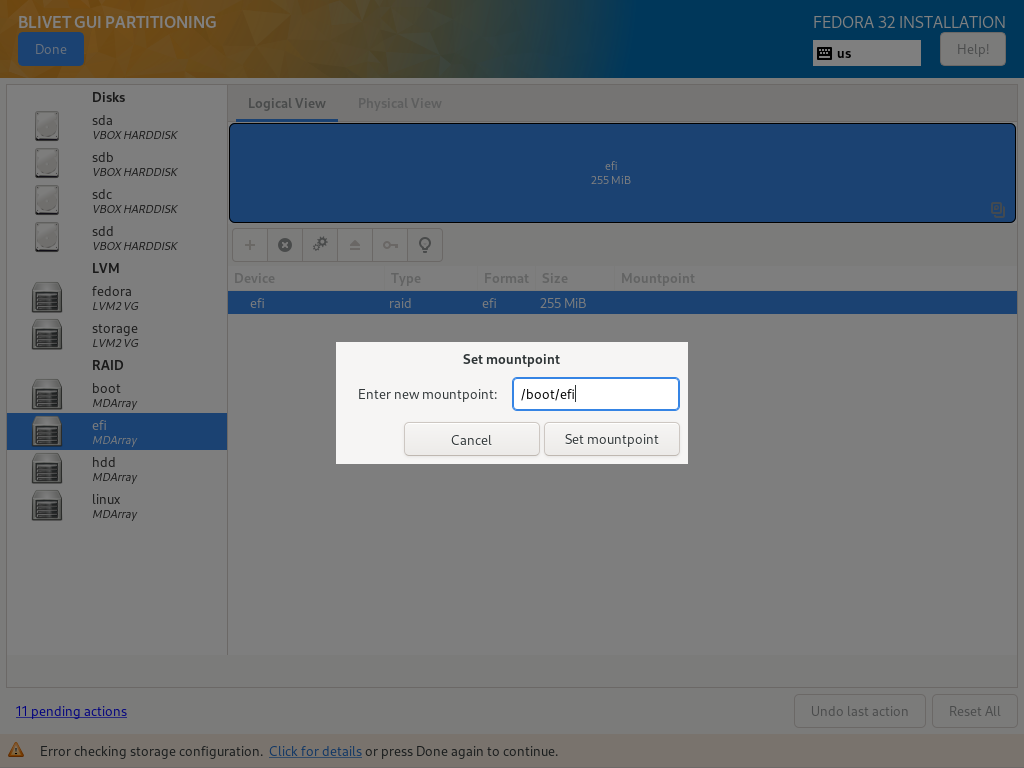
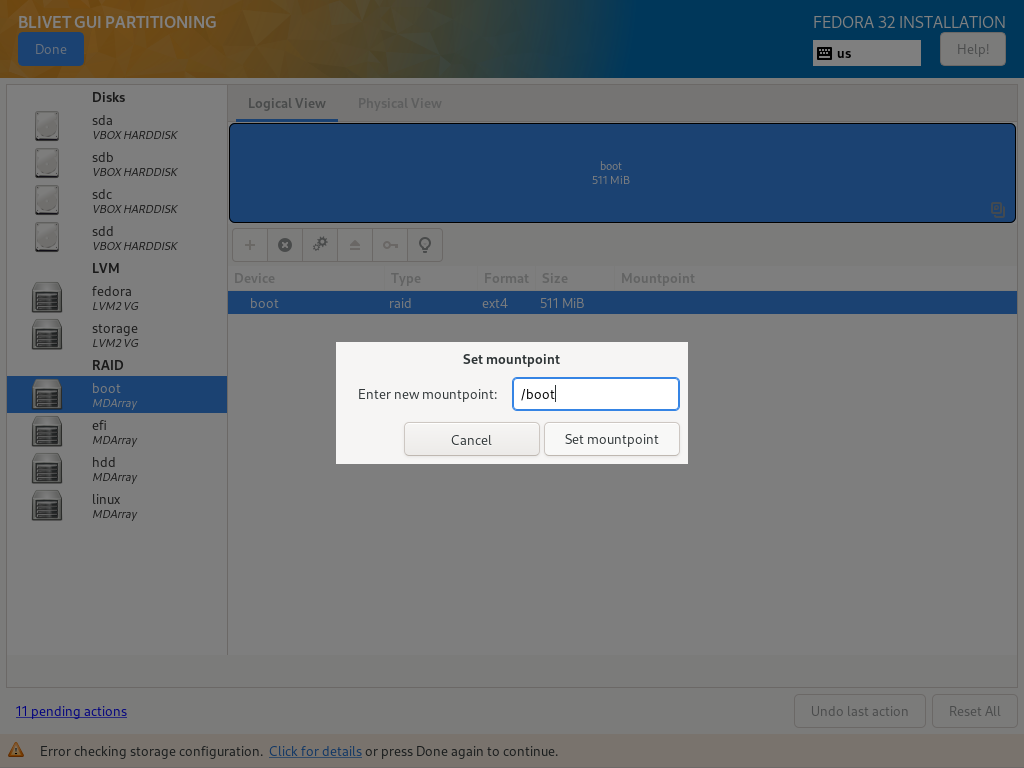
Turns out, than when you create efi / boot partitions, Blivet does not asks for a mountpoint. Fortunately you can add it manually after creating a partition:
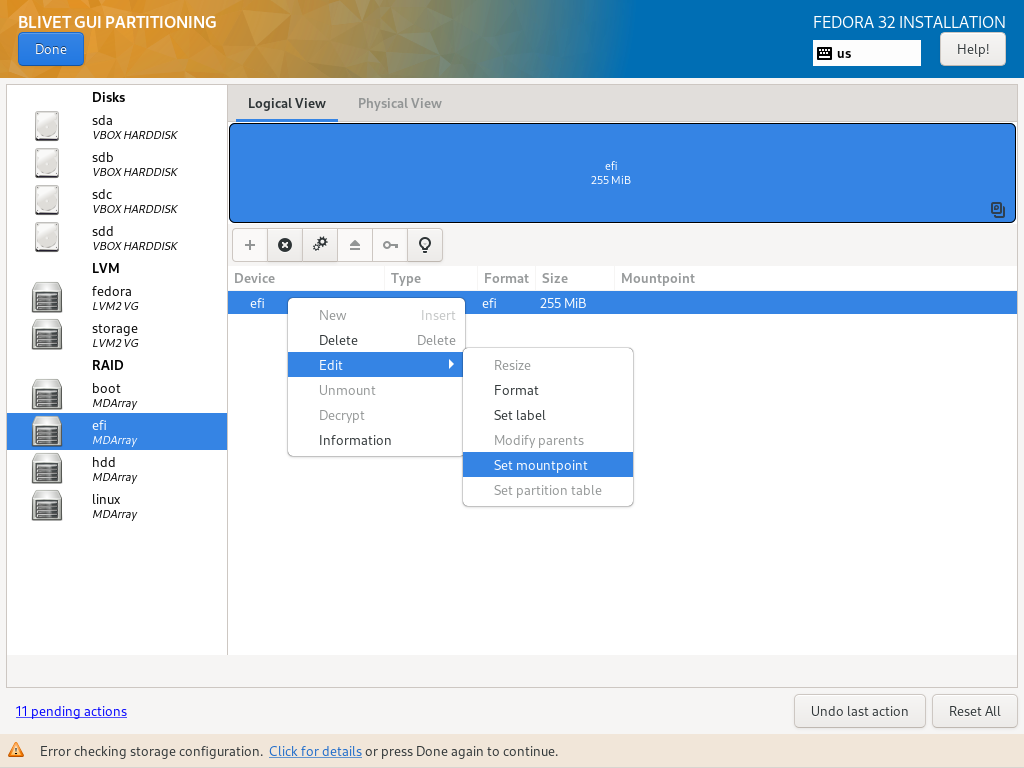 Context menu entry to set a mountpoint
You need to set following mountpoints:
- efi partition: /boot/efi
- boot partition: /boot
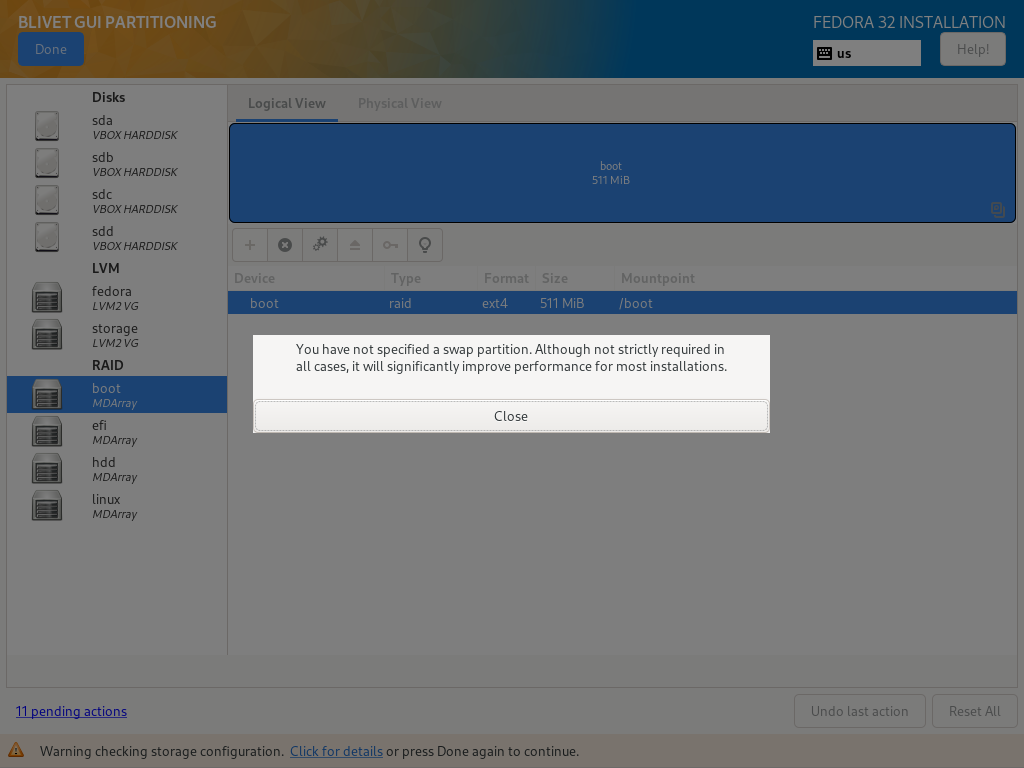
When you finish partitioning, Blivet will warn you about missing swap partition. I chose to skip it as my server has more than enough RAM.

Once partitioning process is done, proceed with the installation as usual. After successful installation, boot the system for the first time - type a password to unlock system (and storage) volumes and log in to the system.
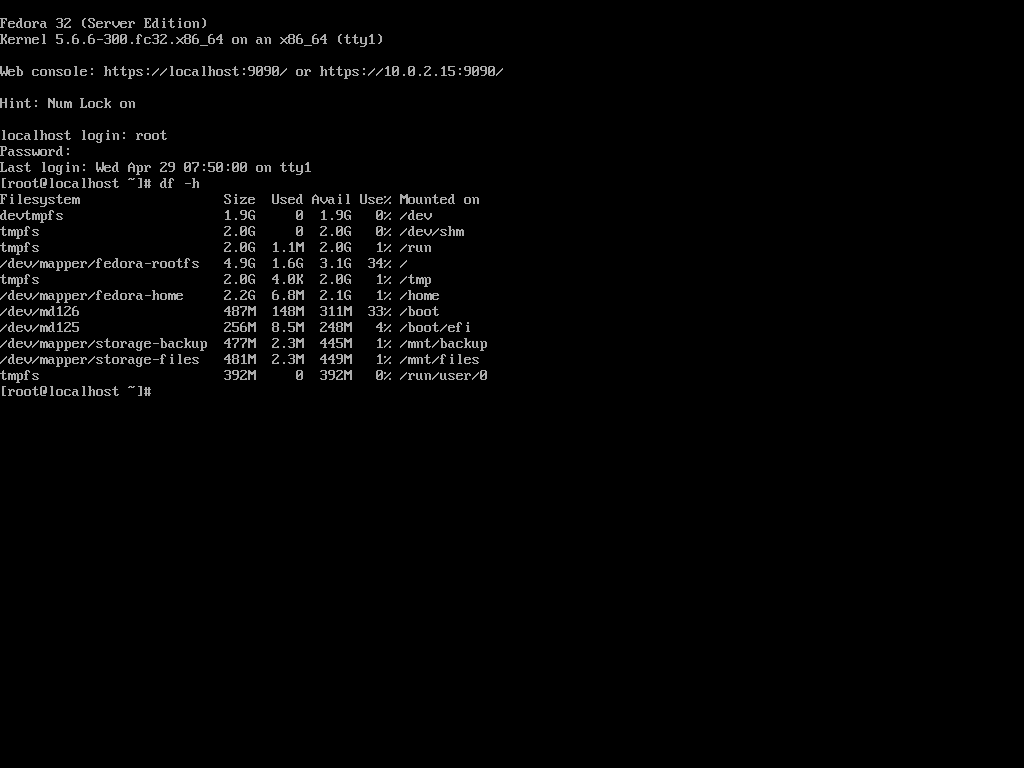 Summary of mounted volumes on Fedora Server
Hard way - use terminal
If for some reason you’d pick other distribution that does not support this kind of partition / array layout, you can create the same setup with following set of commands:
# Create partitions on first SSD
$ parted /dev/sda
  mklabel gpt
  mkpart efi fat32 0% 256MiB
  set 1 esp on
  mkpart boot ext4 256MiB 512MiB
  mkpart linux ext4 512MiB 100%
  quit

# Same goes for second SSD
$ parted /dev/sdb
  mklabel gpt
  mkpart efi fat32 0% 256MiB
  set 1 esp on
  mkpart boot ext4 256MiB 512MiB
  mkpart linux ext4 512MiB 100%
  quit

# Create RAID1 arrays
$ mdadm --create /dev/md0 --level 1 --raid-disks 2 --metadata 1.0 --name efi     /dev/sda1 /dev/sdb1
$ mdadm --create /dev/md1 --level 1 --raid-disks 2                --name boot    /dev/sda2 /dev/sdb2
$ mdadm --create /dev/md2 --level 1 --raid-disks 2                --name linux   /dev/sda3 /dev/sdb3
$ mdadm --create /dev/md3 --level 1 --raid-disks 2                --name hdd     /dev/sdc  /dev/sdd

# Encrypt RAID arrays
$ cryptsetup luksFormat /dev/md2
$ cryptsetup luksFormat /dev/md3

# Open encrypted RAID arrays
$ cryptsetup luksOpen /dev/md2 linux
$ cryptsetup luksOpen /dev/md3 hdd

# Create LVM volumes for operating system
$ pvcreate /dev/mapper/linux
$ vgcreate fedora /dev/mapper/linux
$ lvcreate -n rootfs -L 5G fedora
$ lvcreate -n home -l 100%FREE fedora

# Create LVM volumes for storage drives
$ pvcreate /dev/mapper/hdd
$ vgcreate storage /dev/mapper/hdd
$ lvcreate -n backup -L 512M storage
$ lvcreate -n files -l 100%FREE storage

# Optionally, create filesystems on created volumes
$ mkfs.fat -F 32 /dev/md0
$ mkfs.ext4 /dev/md1
$ mkfs.ext4 /dev/fedora/rootfs
$ mkfs.ext4 /dev/fedora/home
$ mkfs.ext4 /dev/storage/files
$ mkfs.ext4 /dev/storage/backup
System tweaking
RAID1 is up and running, but it has a flaw - EFI partition has a potential problem of being written outside of software RAID control and getting out of sync. I found a very good explanation and a solution to manage EFI partition under software RAID in this post. In short, you need to disable EFI RAID from automatic assemble at boot, write a service that will handle initial sync, assemble array and mount the partition:
/etc/mdadm.conf
MAILADDR root
AUTO +imsm +1.x -all
ARRAY /dev/md/boot level=raid1 num-devices=2 UUID=6cf5f3aa:0844b72f:e94813d2:58a403da
ARRAY /dev/md/efi level=raid1 num-devices=2 UUID=b198d2d3:5a9b9478:2fd14099:492f012e
ARRAY /dev/md/hdd level=raid1 num-devices=2 UUID=3abf276a:4130a910:a906d12a:099b7570
ARRAY /dev/md/linux level=raid1 num-devices=2 UUID=be22eb4f:281dc214:88ed8577:50dff25d
Second ARRAY entry is entry of interest - /dev/md/efi must be replaced with <ignore> and metadata=1.0 must be added before UUID=. After modification, entry should look like this:
ARRAY <ignore> level=raid1 num-devices=2 metadata=1.0 UUID=b198d2d3:5a9b9478:2fd14099:492f012e
/etc/fstab
/dev/mapper/fedora-rootfs                 /                       ext4    defaults,x-systemd.device-timeout=0 1 1
UUID=638cf124-75e6-4625-b7cb-b1a8fe09b499 /boot                   ext4    defaults                            1 2
UUID=2A53-CA0B                            /boot/efi               vfat    umask=0077,shortname=winnt          0 2
/dev/mapper/fedora-home                   /home                   ext4    defaults,x-systemd.device-timeout=0 1 2
/dev/mapper/storage-backup                /mnt/backup             ext4    defaults,x-systemd.device-timeout=0 1 2
/dev/mapper/storage-files                 /mnt/files              ext4    defaults,x-systemd.device-timeout=0 1 2
Minimal change is to add noauto to mount options of /boot/efi entry. I also changed UUIDs to RAID array device names (both UUIDs correctly points to respective arrays):
/dev/md/boot                              /boot                   ext4    defaults                            1 2
/dev/md/efi                               /boot/efi               vfat    noauto,umask=0077,shortname=winnt   0 2
systemd service
/boot/efi was excluded from automatic filesystem mounting, so this mountpoint must be mounted by other means. Since the goal of that change is to have consistent EFI partition content on all EFI RAID array members, we’ll write a systemd service that will assemble and resync EFI RAID array.
Create new file under /etc/systemd/system/resync-efi-raid-array.service with following content:
[Unit]
Description=Resync EFI RAID1 partitions
DefaultDependencies=no
After=local-fs.target

[Service]
Type=oneshot
ExecStart=/usr/sbin/mdadm -A /dev/md/efi --update=resync --uuid={uuid-of-efi-raid-array}
ExecStart=/usr/bin/mount /boot/efi
RemainAfterExit=yes

[Install]
WantedBy=sysinit.target
Replace {uuid-of-efi-raid-array} with UUID= value from /etc/mdadm.conf corresponding to EFI partition (in this example it’s b198d2d3:5a9b9478:2fd14099:492f012e).
Test the service
In order to test that everything is working as expected, execute following commands:
# Unmount /boot/efi
$ umount /boot/efi

# Stop EFI RAID array. It'll be restarted by systemd service
$ mdadm --stop /dev/md/efi

# Start the service
$ systemctl start resync-efi-raid-array.service

# Check service status
$ systemctl status resync-efi-raid-array.service
If service have started without an error and you have properly mounted /boot/efi directory, then enable the service to run at boot:
$ systemctl enable resync-efi-raid-array.service
Testing the RAID
To check that everything works as expected, I removed spare disks from the virtual machine to test that the system is still functional. System booted, though first boot took surprisingly long - around two minutes. After ensuring that indeed it was working, I re-attached spares (or simply added again) to respective arrays:
$ mdadm --manage /dev/md/efi --add /dev/sdb1
$ mdadm --manage /dev/md/boot --add /dev/sdb2
$ mdadm --manage /dev/md/linux --add /dev/sdb3
$ mdadm --manage /dev/md/hdd --add /dev/sdd
After that mdadm reported that spares were rebuilding - as expected. It concludes that the solution did it’s job.
Summary
Although complicated, given setup ensures proper data redundancy with RAID, coupled with data security (LUKS encryption). Software RAID ensures that disks can be moved to another PC without risk of not being able to boot the arrays.
At this point server configuration is complete, but it’s not the end. Every NAS still has one advantage over the setup - they’re all headless, while PC needs a display and a keyboard in order to boot (or specifically, type encryption password to proceed with the booting process). This problem will be solved in Part 2 of this post.